weebly statistics
Home About Links Contacts Show Show

Simple Halloween Favors

Halloween has always been a favorite holiday around here. It has become more fun in the past years with little kids around to dress up and introduce the holiday traditions. Halloween parties are always fun, and more and more are happening that are really family friendly. Here are some fun ideas to liven up your own party or to take to a friend’s party to have some fun. These are all easy ideas that can be made with items on hand or some from your local dollar store.
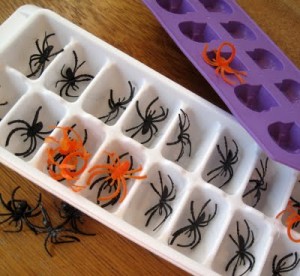
Spider Ice Cubes

A great and easy favor is to buy the small spider rings that are everywhere during the Halloween season and make them into ice cubes! There are the tradition

al black ones, but I have also seen assortments of spider rings in many colors. I found a bag that had some purple, green and orange mixed in with the black! Use your imagination! There are often bags of goodies that you can find at the store, it doesn’t have to be limited to just the spider rings. Just make sure whatever favor you pick, you choose one that won’t get ruined being soaked in water.

The ice cubes are made in a regular ice cube tray you most likely already have. Just place one spider ring in each ice cube section and pour water over! To make it even more fun, I will often use the juice or punch that I plan to use at the party and make ice cubes out of that. So when the ice melts, instead of watering down your juice, it just adds to the flavor. There are many recipes floating around online, so use your creativity. But this is a great and easy way to add some fun to your party.

Spider Ice Cubes

Ghost Lollipops

Another fun treat that you can use for a party or even trick-or-treaters is ghost lollipops! This is an easy craft that you can get kids involved in making. You just need some suckers from the store, some white fabric (or tissue paper), some ribbon, scissors and markers. The squares need to be big enough to cover the suckers to make their heads with enough leftover to make the body. You will tie your ribbon blow the head of the ghost and then add a face with the markers! This is an easy and fun craft that has been around since I was little.

Whatever your Halloween plans end up being, these are easy crafts that can be done with some cheap supplies. That is always a bonus when planning for a party, or for special treats to be handed out to trick or treaters. Even if you don’t have a party, it would be fun to make the ice cubes to have for a special Halloween dinner! These ideas can be used any time of year, just swap out the spiders for another fun prize and accessories can be added to the ghost lollipops to make them almost anything! Just remember to have fun!

Ghost Lollipops

Written By: Gena W., The Mom Crowd Contributor

Easy DIY Craft For Your Toddler – Fall Wreath

Fall has arrived – Time to get Crafty!

Autumn Leaf Wreath

It is that time of year again! The weather is starting to cool down and the leaves are starting to change colors. The change of the season is always a favorite time of the year, especially when you have some little kids at home to enjoy it with. A fun activity to do with toddlers or older kids is a fall wreath. Best part…you can most likely make it with items you have around your house!

Things you will need:

  • paper plate
  • construction paper
  • scissors
  • glue (If you have older kids you can let them cut out and color the leaves themselves.)

Preparation:

A fun way to prep this activity would be to take your child on a walk around your own neighborhood to  talk about the changes they see. The conversation can be turned towards fall by talking about the changes in nature around your own home. Things will start to look different, and even smell different! You could also bypass the paper leaves and have some fun collecting leaves you find on the ground to add to your wreath. This is all just a fun way to tie the art project into things that are going on in the world outside your home.

Directions:

Start your wreath by cutting a circle out of the center of the paper plate. You will want to poke a hole with your scissors to leave the outer ring intact. The paper plate will make up the form of the wreath. The next step will be to gather your construction paper and cut out leaves from the colors. Use some green, brown, red, orange, or yellow paper to mimic the colors your child saw on their walk! The leaves can be various sizes as well. Just make sure enough are available for your child to have a variety to choose from.

Then have your child sit down at a table they can do crafts at. Some younger children may do better sitting in a highchair or booster seat. Depending on the individual child, they may be able to apply the glue to the wreath form themselves, or it might need to be done for them. But they should have fun putting leaves on the wreath form! Encourage your kiddo to spread the leaves around and fill up the wreath. And if more glue needs to be applied, then go for it! This wreath is going to be artwork!

When the wreath is all finished, it needs to be laid flat to dry overnight. When the wreath is dry, have your child help you pick a place to put it in the house. You could even cut out multiple plates so that your child can give a wreath to a grandparent, babysitter or neighbor. It is a nice way to embrace the entrance of fall! These wreaths would also make a great art piece for the front door or window of your house. Kids take so much pride in their works of art, they will be so proud to show it off!

Written By: Gena W., The Mom Crowd Contributor


Advertising:


Blog Ads:


Marketplace